Introduction to Winter Wonderland Nails Art
Step into a frosty realm of enchantment with our Winter Wonderland Nail Art collection. Embrace the season’s magic as we blend elegance with the whimsy of snowflakes, icicles, and the serene beauty of winter landscapes. Our curated designs promise to adorn your nails with a touch of seasonal charm, creating a dazzling showcase of winter wonder at your fingertips. Let your nails tell the story of a sparkling, snow-kissed adventure with our enchanting nail art creations.
Prep Your Nails
Start by cleaning and shaping your nails. Apply a base coat to protect your nails and promote a longer-lasting manicure. Start with a base coat of frosty white or icy blue nail polish to represent the snowy canvas of winter. This sets the stage for the wintry theme.
Base Color
Paint all your nails with a base color. White or light blue are popular choices for a Winter Wonderland theme. You can also create an ombre effect with a gradient of light blue and white or add a touch of silver glitter polish for a frosty look. Allow the base color to dry completely.
Snowflakes
Each nail can have a thin coating of snowflakes applied to it using a dotting tool or nail art brush. You can also use pre-made snowflake stickers or nail decals for a quicker application.. Arrange them as you choose on your nails, making sure that every nail has a different snowflake pattern.
Icicles
Mimicking the glistening beauty of icicles is another popular theme. Long, tapering lines on the nails can represent the frozen elegance of icicles. These can be done in various shades of blue or clear polish to enhance the icy effect.
Evergreen Accents:
Add festive elements like holly berries and evergreen branches to a couple of nails. These can be hand-painted or applied using nail art decals or stickers, bringing a touch of holiday cheer to your Winter Wonderland Nails. Using a nail art brush or toothpick, draw delicate evergreen trees on one or two accent nails using a silver or dark green polish. Keep them whimsical and minimalistic to maintain the enchanted feel.
Accent Nails
Choose one or two nails as accent nails. For these, you can add extra details like a winter tree, penguin, polar bear, or any other Winter Wonderland element. Get creative and mix different designs for a unique look. Allow the accent designs to dry completely.
icy Tips: Choose
Apply a transparent glitter polish or a silver polish to the tips of your nails to resemble icicles for an added icy touch. This a choice step can give your Winter Wonderland nails a hint of glimmer.
Topcoat
Experiment with texture by combining matte and glossy finishes. For instance, apply a matte topcoat to some nails for a snow-like effect, while keeping others glossy to highlight certain design elements. A clear topcoat to seal the design and add gloss when all of the nail art has dried. This preserves the freshness of your Winter Wonderland nail art and helps keep it safe.
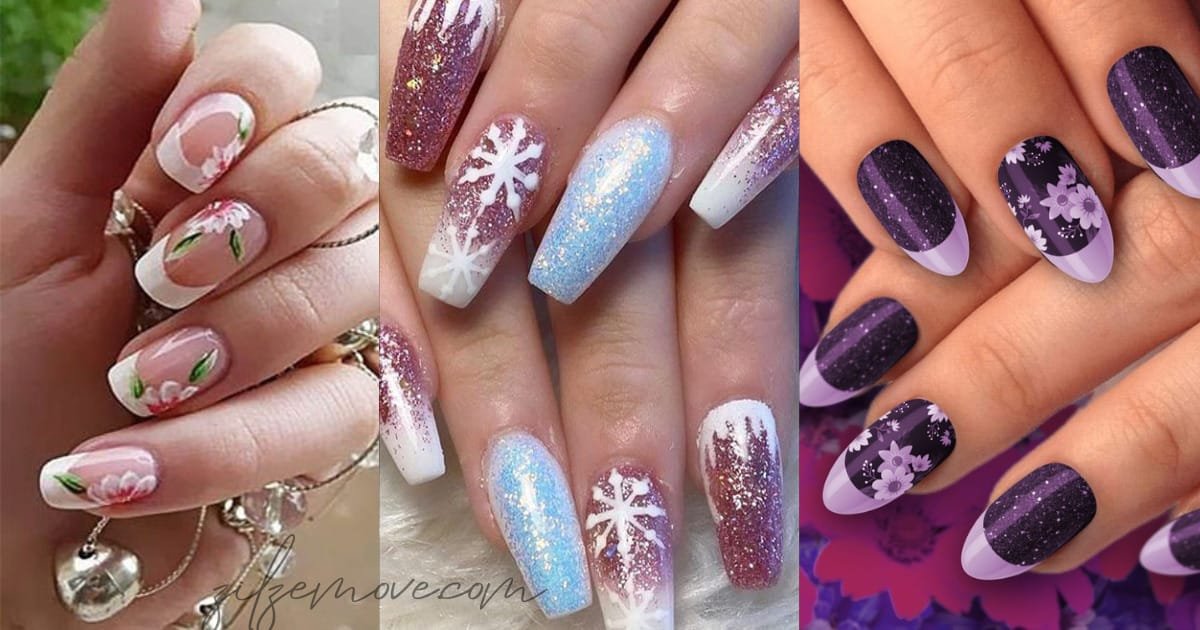
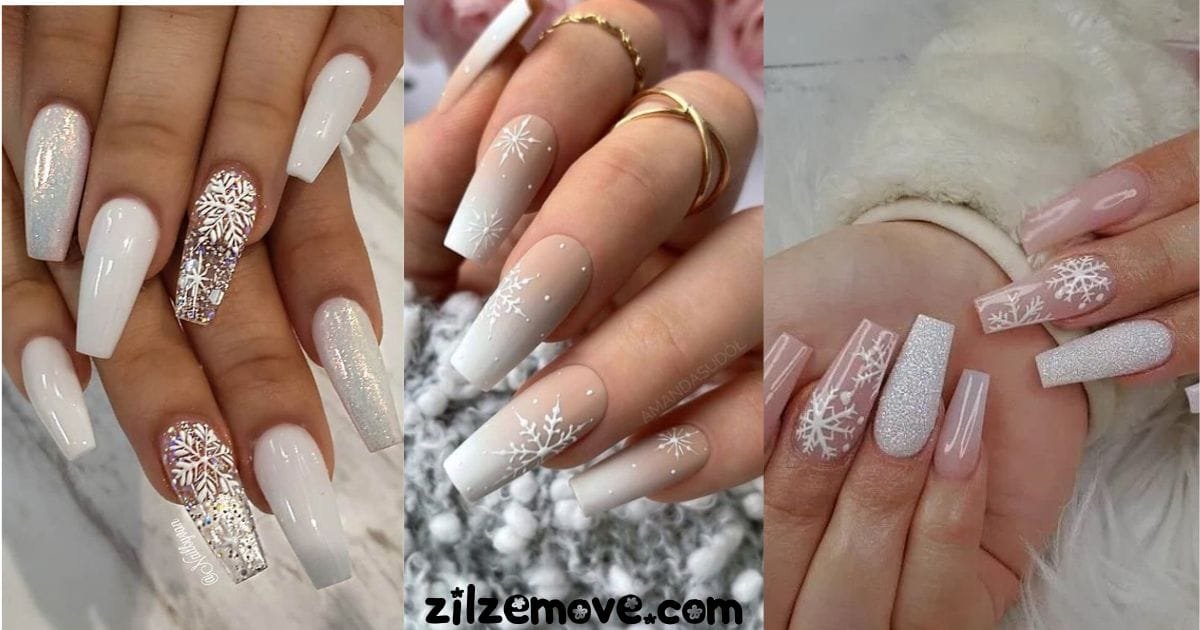
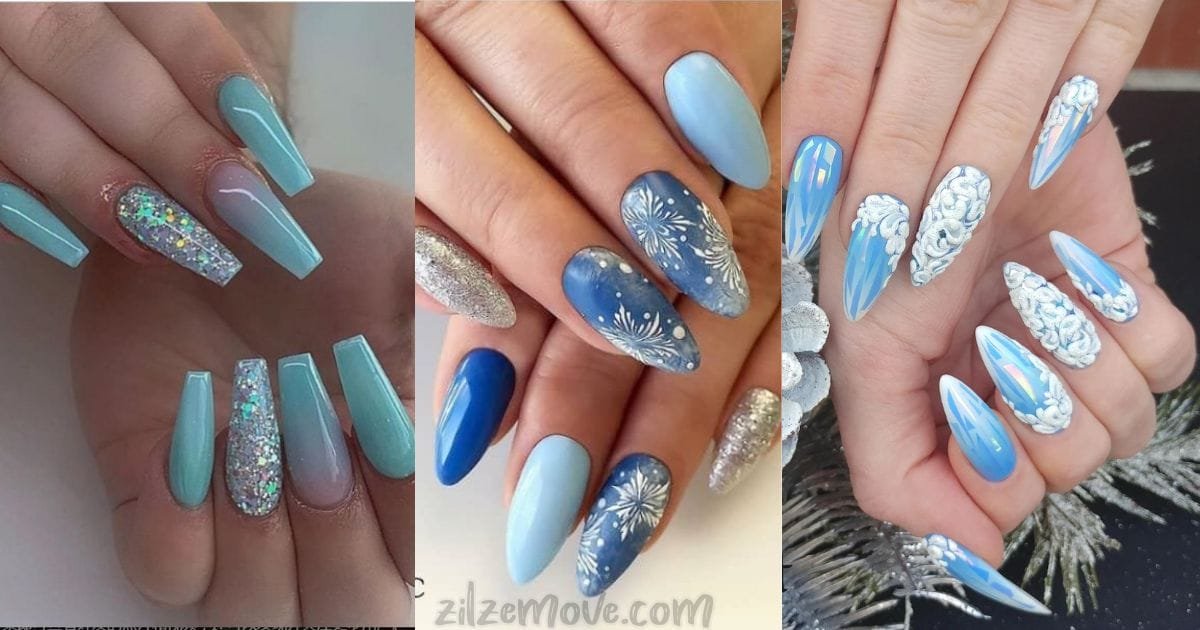
Snowflake Nail Art Designs
Winter has a beautiful effect that transforms surroundings into tranquil wonderlands. Our creative juices flow as the temperature lowers and the world is softly covered with snowflakes. With snowflake nail art that adds a hint of icy beauty to your fingertips, you can embrace the charm of the season.
Winter Wonderland Palette
Begin your snowflake nail journey by choosing a winter-inspired color palette. Opt for cool tones like icy blues, soft whites, and shimmering silvers to capture the essence of a snowy landscape. These hues set the perfect canvas for your snowflake masterpiece.
Subtle Shimmer and Glitter
Enhance the wintry vibe with a subtle touch of shimmer and glitter. Choose nail polishes with a delicate sparkle to mimic the glistening effect of snow in the sunlight. A light dusting of glitter or a gradient of sparkles adds a magical dimension to your snowflake nail designs.
Delicate Snowflake Accents
Today, whereas you paint tiny snowflakes on your nails, let your imagination go wild. If you want to paint beautiful designs on your nails more quickly, use nail decals of snowflakes instead of a fine-tipped nail art brush. Try out a variety of patterns, from traditional six-pointed snowflakes to wackier and more original ones.
Accent Nails and Negative Space
Consider using negative space to your advantage by incorporating accent nails. Leave some nails bare or opt for a sheer polish to create a striking contrast with your snowflake-adorned nails. This technique adds sophistication to your overall nail design.
Dimensional Details
By including dimensional features, you may elevate your snowflake nail designs. Use 3D nail art components to add depth and texture to your manicure, such as pearls, rhinestones, or small snowflake charms. These additions produce a haptic and striking impression.
Ombre and Gradient Effects
Play with ombre and gradient effects to evoke the subtle transitions of winter skies. Blend different shades seamlessly on each nail or create a gradient across your entire manicure. This technique adds a dreamy and ethereal quality to your snowflake-inspired masterpiece.
Matte Finishes for a Modern Twist
For a contemporary touch, experiment with matte finishes. Apply a matte topcoat over your snowflake nail designs to transform the glossy elegance into a sophisticated matte masterpiece. This unexpected twist adds a modern flair to your winter-inspired nails.
Cozy Sweater Nail Art
The Cozy Sweater Nail Art trend is a fun and cozy way to show your style in the world of nail art, where originality has no limits. This style gives you access to the coziness and comfort of warm sweaters, akin to our favorite winter knits. Let’s explore the subtleties of this imaginative and endearing nail design.
The Allure of Cozy Sweater Nail Art
Picture your nails adorned with miniature patterns that mimic the texture and feel of your coziest winter sweater. The appeal lies not just in the artistry but also in the nostalgia it evokes—those cherished moments of wrapping yourself in a snug blanket, sipping hot cocoa, and basking in the glow of a crackling fireplace.
Design Elements
Warm Sweater A wide range of design motifs are embraced by nail art, including Fair Isle designs and traditional cable knits. Nail artists frequently employ a subdued colour scheme, such as gentle greys, warm browns, and creamy whites, to evoke the earthy tones of winter. The outcome is a design that is sophisticated and inviting.
Texture and Detail
What sets Cozy Sweater Nail Art apart is its emphasis on texture. Artists employ various techniques to create the illusion of knitwear, including 3D gel, acrylics, and even the use of real fabric. The attention to detail is impeccable, with tiny stitches and woven patterns that make your nails look like a cozy masterpiece.
Seasonal Versatility
While initially associated with the winter season, Cozy Sweater Nail Art has proven its versatility. As a year-round trend, it adapts seamlessly to different color schemes and themes. Whether you’re opting for autumnal hues or pastel shades for spring, the cozy sweater concept is adaptable and always in vogue.
Express Yourself
Cozy Sweater Nail Art is a distinctive method to express your personality that goes beyond its aesthetic appeal. Your nails become into personal canvases where you may display your favourite designs, hues, and textures. There’s a warm sweater nail art style for everyone, regardless of your preference for simple patterns or striking, detailed ones.
Do-it-yourself
The accessibility of Cozy Sweater Nail Art is among its best features. Although proficient nail technicians are capable of producing elaborate designs, the craze is do-it-yourself friendly, enabling fans to play around with textures and patterns at home. With the correct equipment and a little imagination, anyone can create the adorable cozy sweater manicure.

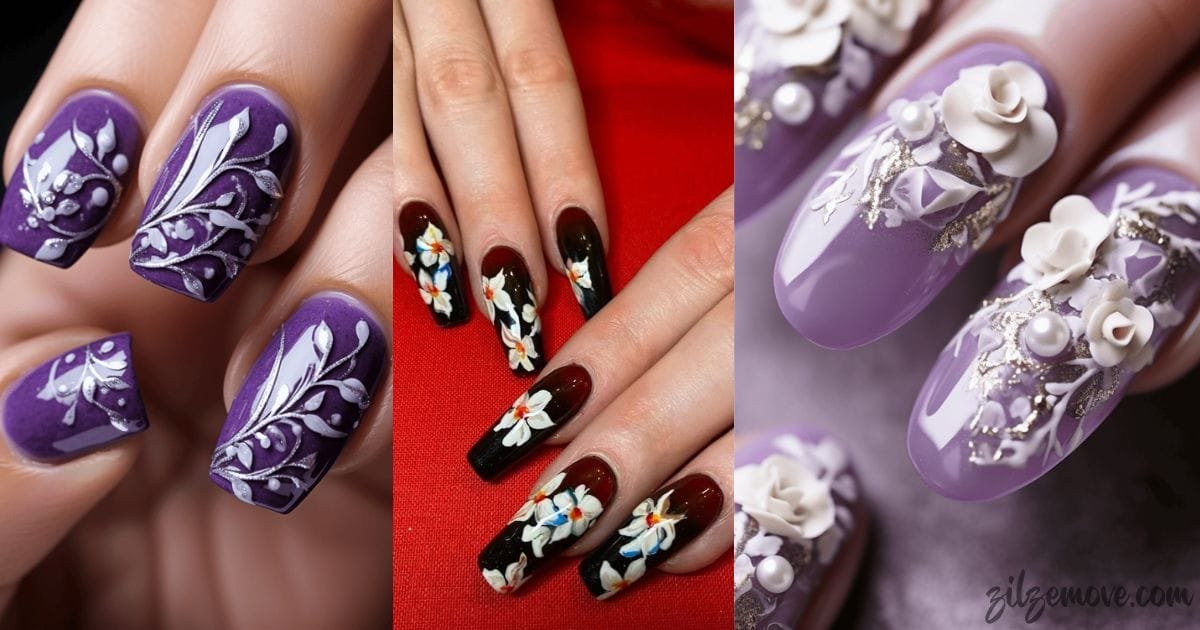
Winter Floral Nail Art
The world is enveloped in a frosty embrace by the chill of winter, making it the ideal moment to include some warmth and charm into your wardrobe. Discover the charming realm of winter flower nail art, where seasonal coziness blends with delicate blooms. Even in the coldest months, let the beauty of nature be captured on your nails like a work of art.
Frost-Kissed Petals
Start by choosing a soft, wintry base color like icy blue, muted lavender, or deep burgundy. Once your base is set, delicately paint snow-kissed petals on each nail. Use pastel shades for a subtle effect or go bold with rich, contrasting colors. The result? A mesmerizing fusion of winter’s chill and the warmth of floral elegance.
Evergreen Bouquet
Take inspiration from the steadfast evergreen trees that brave the winter cold. Paint a subtle evergreen base and adorn your nails with petite pinecones, holly berries, and tiny blossoms. This sophisticated look captures the essence of the winter forest, making your nails a breathtaking masterpiece.
Glistening Snowflakes and Roses
For a style that’s detailed and intriguing, combine the timeless beauty of roses with the magic of snowflakes. Choose a neutral base and delicately paint detailed snowflakes on a few nails. Accentuate the remaining nails with dainty roses, creating a harmonious blend of winter’s purity and floral allure.
Icy Florals on Metallic Hues
Elevate your winter floral nail art by incorporating metallic hues like silver, gold, or rose gold. Choose a metallic base and paint delicate icy florals on top. The metallic backdrop adds a touch of glamour, turning your nails into a sophisticated statement piece that perfectly balances the delicacy of florals with the opulence of winter.
Nordic Bloom Elegance
Draw inspiration from Nordic winter landscapes by combining geometric patterns with floral accents. Choose a muted color palette, and create a fusion of clean lines, snowflakes, and minimalist blooms. This Nordic-inspired nail art adds a touch of modern sophistication to your winter ensemble.
Vintage Winter Garden
For a nostalgic touch, opt for a vintage winter garden theme. Choose a muted, pastel base and paint intricate roses, daisies, and violets reminiscent of classic botanical illustrations. The result is a timeless and romantic nail art design that captures the essence of a winter garden in full bloom.
Subtle Sparkle
Bring a touch of winter magic to your floral nail art by incorporating subtle sparkle. Glittery accents or a delicate dusting of shimmer can mimic the glistening frost on winter blooms. Opt for a clear or iridescent topcoat to add a frosty sheen to your floral masterpiece without overpowering the intricate details.
Minimalist Marvel
For those who prefer a more understated look, minimalist winter floral nail art is a perfect choice. Choose a neutral base color like a soft gray or muted mauve and add simple, delicate flowers in white or metallic tones. This approach not only exudes elegance but also allows for versatility, making it suitable for both casual and formal occasions.
Festive Florals
Winter floral nail art is a fun way to commemorate the occasion. Add traditional Christmas elements to your flower arrangement, such pine cones, holly berries, and snowflakes. For a cheerful, festive vibe, try incorporating traditional holiday colours like gold, green, and red into your nail art.
Seasonal Symbols
Explore the rich symbolism associated with winter flora. Poinsettias, amaryllis, and winter roses are not only visually striking but also carry cultural significance. Incorporate these symbolic blooms into your nail art to add depth and meaning to your winter-inspired designs.
Detailed Delights
The beauty of winter floral nail art lies in its intricate details. Experiment with different brush sizes and nail art tools to create detailed petals, leaves, and stems. Consider adding dimension with 3D elements like rhinestones or studs for an extra touch of glamour.
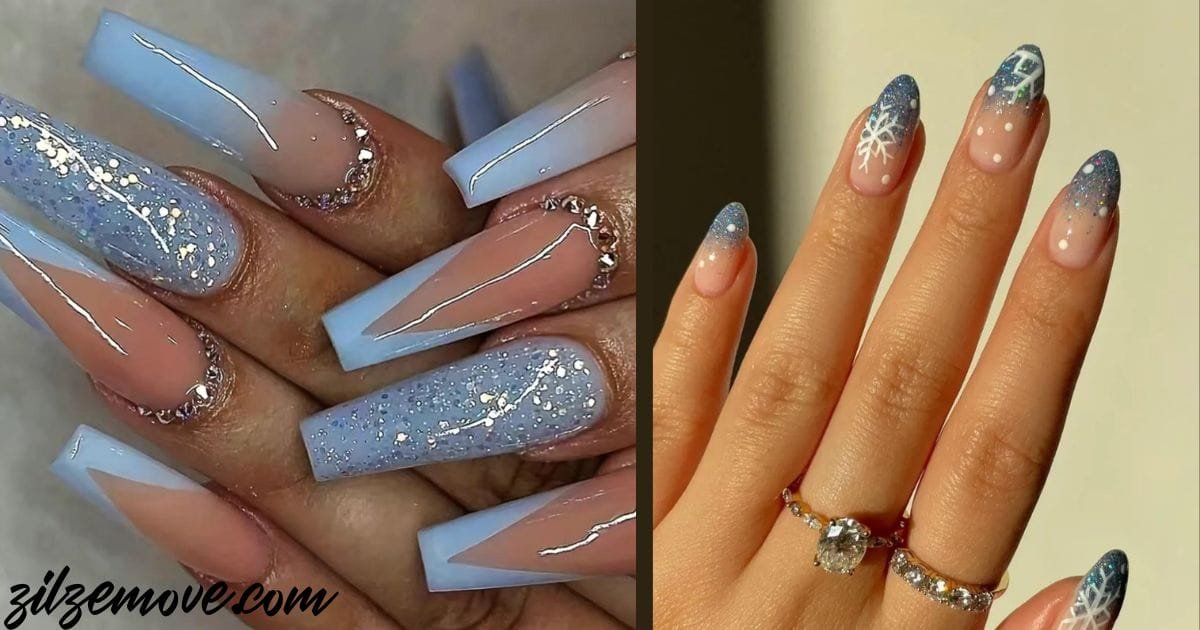
Frozen Lake Nail Art
In the vast canvas of nail art, where creativity knows no bounds, one trend has emerged to captivate our imaginations – Frozen Lake Nail Art. This enchanting style takes inspiration from the serene beauty of frozen lakes, translating it into a mesmerizing and unique form of self-expression.
The Palette of Frost
The key to achieving the perfect Frozen Lake Nail Art lies in the selection of colors. The palette predominantly revolves around icy blues, shimmering whites, and subtle grays. These shades mimic the serene and chilly ambiance of a frozen lake, creating a calming and sophisticated effect on the nails.
The Essence of Frozen Lake Nail Art
With its calm and quiet atmosphere, Frozen Lake Nail Art perfectly embodies the spirit of winter. Imagine the gentle colours of the frosty surroundings reflected on the shimmering surface of a frozen lake. To evoke the icy splendour of a winter setting, the design frequently uses blue, silver, and white hues. The frozen lake motif is brought to life on your nails by nail artists using a variety of methods like gradients, glitter, and texture, which results in an amazing visual effect.
Color Palette
The selection of colors is crucial for creating an enthralling Frozen Lake nail art. Generally, the palette is centred on chilly tones, with blue in all its shades taking centre stage. From deep navy blues reminiscent of frozen depths to pale baby blues representing the frosty surface, the color range allows for endless creativity. A realistic snow and ice impression can be produced by using white or silver accents, which enhances the overall wintry look.
Gradient Magi
Start by creating a gradient on your nails using different shades of blue. Begin with the darkest shade at the cuticle, blending into lighter blues towards the tips. This gradient mimics the transition from the deep, frozen depths of the lake to the icy surface.
Glittering Ice Crystals
Add a touch of glamour to your Frozen Lake Nail Art by incorporating glitter. Apply a fine, silver glitter polish to represent glistening ice crystals. Concentrate the glitter towards the tips of the nails, creating the illusion of sunlight reflecting off the frozen surface.
Snowy Accents
Use a white nail polish or acrylic paint to add snowy accents. Create small, delicate snowflakes or dots resembling falling snow on the nails. This step adds a sense of movement and whimsy to the overall design.
Matte Finish
To enhance the frozen effect, finish off your design with a matte top coat. This gives the nails a smooth, velvety finish that mimics the matte appearance of frozen surfaces.
Accent Nails
Consider creating accent nails with unique winter-themed designs such as snow-covered trees, polar bears, or ice skates. This adds a touch of personality to your Frozen Lake Nail Art and allows for even more creative expression.
Texture and Depth
What sets Frozen Lake Nail Art apart is its emphasis on texture and depth. Nail artists often incorporate various techniques, such as gradient shading, ombré effects, and even 3D elements like rhinestones or tiny snowflakes. These details contribute to the overall illusion of depth, making the nails look like a frozen landscape under a glistening layer of ice.
Crystalline Accents
To accentuate the frozen lake theme, artists often introduce crystalline accents. These can be achieved using specialty nail polishes with holographic or iridescent finishes. The play of light on these crystalline accents mimics the reflection of sunlight on icy surfaces, adding a touch of magic to the overall design.
Winter Wonderland Nail Decals
For those who prefer a more intricate design without the fuss of hand-painting, winter-themed nail decals can be incorporated. Snowflakes, icicles, and frosty patterns can be strategically placed to enhance the Frozen Lake Nail Art, creating a stunning and detailed composition.
The Art of Layering
Layering is a crucial technique in achieving the Frozen Lake Nail Art. Artists skillfully layer different shades and textures to create the illusion of ice layers. Transparent or sheer polishes can be used strategically to imitate the translucency of ice, while opaque shades add depth and dimension.
DIY Tips for Frozen Lake Nail Art
Start with a clean and well-manicured base. Apply a base coat to protect your natural nails. Use a variety of blue, white, and gray polishes for the icy color palette. Experiment with gradient techniques for a seamless transition between colors. To add a little shine, use holographic topcoats or glitter. For intricate hand painting, use a fine brush and nail art supplies, or choose decals with a winter theme.Apply a premium finish to complete and safeguard your artistic creation.
Conclusion:
In the enchanting realm of Winter Wonderland Nail Art, the beauty of the season intertwines with stylish expressions, creating a captivating fusion of frosty elegance. Embrace the allure of winter with nails adorned in intricate designs, where each stroke becomes a testament to both creativity and seasonal charm. Let your fingertips tell a story of frost-kissed glamour, as you navigate the stylish landscape of winter with confidence and flair.